
Help:Syntax
This is a handy guide to the most common bits of Wiki syntax you may want to use.
Basic text formatting markup
| Desired Result | Description | Example |
|---|---|---|
| Italic Text | Two single quotes on each side | ''Italic Text'' |
| Bold Text | Three single quotes on each side | '''Bold Text''' |
| Bold and Italic | Five single quotes on each side | '''''Bold and Italic''''' |
| The "strike" tag | <strike>Strikethru</strike> | |
Preformatted text |
The "pre" tag | <pre>Preformatted text</pre> |
Headlines and Table of Contents
Note: In order for headline syntax to be parsed, it must be placed at the beginning of a line, with no spaces before it.
To create a headline for a section, start and end the line with a number of equals signs. The number of signs determines the level of the headline.
Level 1 headlines are used for page titles themselves. Please do not use them in pages.
== Main page sections are Level 2 ==

=== Subsections are level 3 ===

==== You can go to level 6 but beyond 4 is pushing it ====
When a page contains four or more headlines, a Table of Contents is automatically generated for it. If you wish to suppress this, put the magic word __NOTOC__ somewhere in the page. (That's two underscores on either side of the letters.)
Lists
Like headlines, the special characters for lists must occur at the beginning of a line, with no spaces. The characters are asterisks for bullets and number/hash/pound signs for numbering. A simple and more complex example are shown below.
|
* Bulleted list item ** Sub-item * Item * Item ** Sub-item *** Sub-sub-item * Item |
|
# Numbered list item #* Bulleted Sub-item #* Bulleted Sub-item # Numbered Item #* Bulleted Sub-item #*# Numbered Sub-sub-item #*# Numbered Sub-sub-item # Item |
Links
| Type of Link | Description | Example | Syntax |
|---|---|---|---|
| A page inside this wiki, with the link text the same as the page title | Enclose the article title in a double pair of square brackets | ... visit Sideling Hill Tunnel for ... | ... visit [[Sideling Hill Tunnel]] for ... |
| A page inside this wiki, with the link text different than the page title | Same as above, but after the article title, put a vertical bar followed by the link text | ... at the tunnel, we found ... | ... at [[Sideling Hill Tunnel|the tunnel]], we found ... |
| A page outside this wiki, with an automatically generated numbered link | The full URL in a single pair of square brackets | ... site is [1], and it ... | ... site is [http://www.google.com/], and it ... |
| A page outside this wiki, with some desired link text | The full URL in a single pair of square brackets, followed by a space, and then the link text | ... site is the well-known search engine, and it ... | ... site is [http://www.google.com/ the well-known search engine], and it ... |
| An external link with the little "external link" icon suppressed | Enclose the external link in <span class="plainlinks">...</span> |
... site is the well-known search engine, and it ... | ... site is <span class="plainlinks">[http://www.google.com/ the well-known search engine]</span>, and it ... |
Images
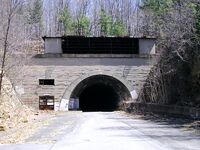
The syntax for the demo image shown below is:
[[File:Sideling_Hill_West.jpg|thumb|200px|link=Ray's Hill Tunnel|This is an image with a 200 pixel width and the '''thumb''' option set. Also clicking it takes you to the Ray's Hill Tunnel page, which is kind of evil of us, because this is a picture of Sideling Hill Tunnel.]]
There can be more than one option, separated by vertical bars. If a caption is used, it's the last thing in the list.
The most frequently used option will be thumb, which gets you a nice box floating off to the right (or left if you also add the left option), with the image having a specific width, and with the caption in a frame.
For examples of the other options, see Help:Images.
Clearing margins after images

If you want to clear margins after a floating image before you go on to the next section of your page, you might want to include the {{Clear}} template in the page, as we do just after this sentence so that we skip past the big picture before the next section.
... And now the margins are clear of floating images.
The <nowiki> tag
If you want to ''demonstrate '''bits''' of wiki syntax '''without''' it actually being processed'', as we just did there, enclose your example in the <nowiki>...</nowiki> tag:
<nowiki>''Demonstrate '''bits''' of wiki syntax '''without''' it actually being processed''</nowiki>